3rd person 3D Character Controller
This short tutorial will show you how to create a Player scene with physics and a visual capsule. It is a great jumping off point for the next tuttorials on scripting the Player movement and animating the Player.
Create your player scene
Create a new scene by clicking the ➕. 
why?
Compartmentalising descrete entities makes the game easier to understand and the Scene outlines clean.
Select the 3D Scene again since our Player will also be 3D. 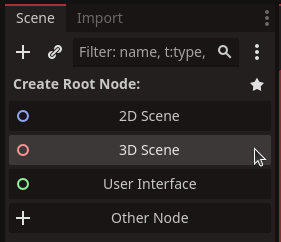
Save our new Scene by right clicking on the [unsaved(*)] tab and then select Save As. 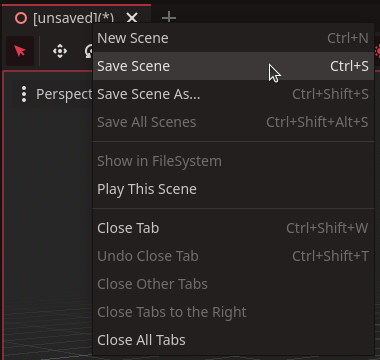
Save the new scene as player.tscn by filling out the File:field and click the Save button. 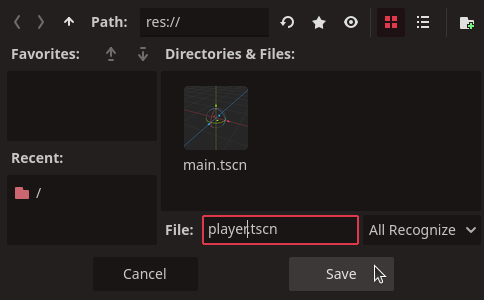
Now change the node type of Node3D by right clicking it and select Change Type...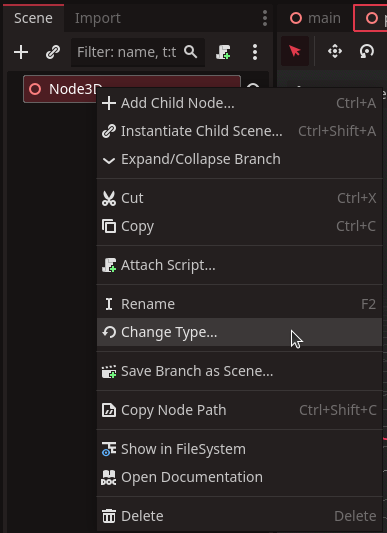
why?
We need our Player scene's root node to be a special included node of the type CharacterBody3D that will provide most of the functionality we need to provide physics, movement and controls.
Search for CharacterBody3D and click the Change button. 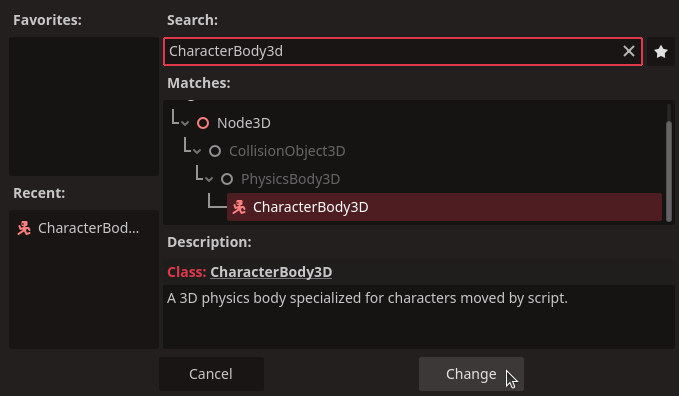
Now rename the Node3D to Player. 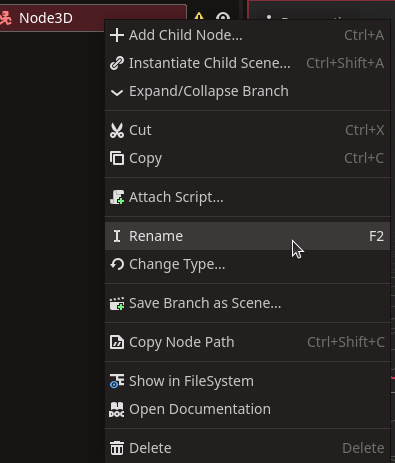
why?
Naming the root node of a scene makes it so that when you add the scene to another, it shows up by the name you gave the root node. So our player.tscn will show up as Player in scenes you add Player to.
We now have a CharacterBody3D with the name of Player and we can move on to the physical presence of our Player.
Adding physics collision to the Player
Some nodes have requirements to work correctly. The CharacterBody3D require a shape. We define the shape by adding CollisionShape3D node to the Player node.

Right click the Player node then select the Add Child Node. 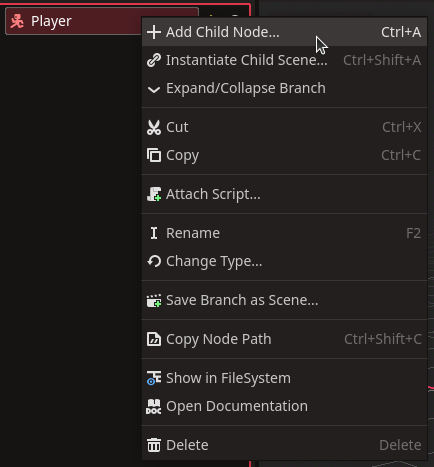
Search for collision and select the CollisionShape3D, then click the Create button. 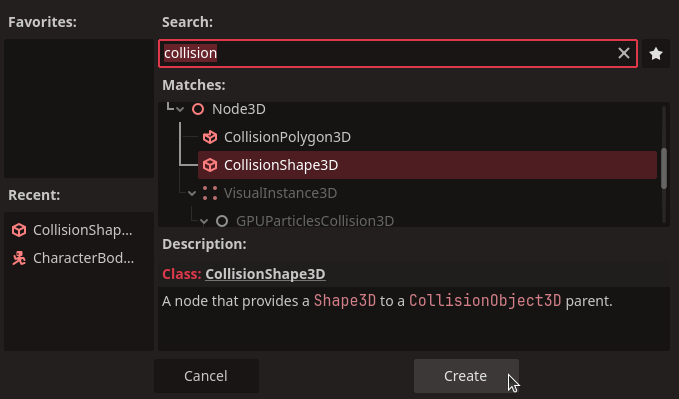
The CollisionShape3D node also require a specific setting. 
So over in the Inspector add a Shape to it by clicking the <empty> Shape property and select the New CapsuleShape3D option. 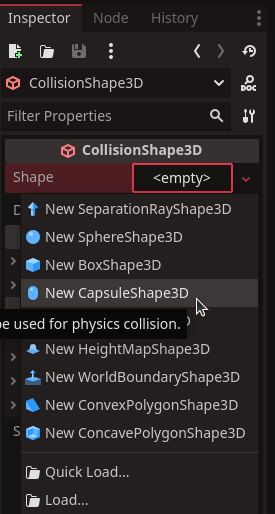
WARNING
A shape centered on it's parent like this can cause problems when placing nodes. It is better to move the CollisionShape3D up so it is above the origin of the root node. 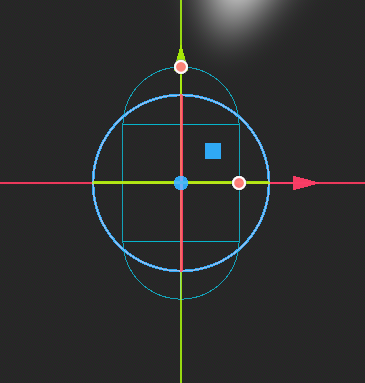
In the Inspector set the Transform to 1 on the Y axis. 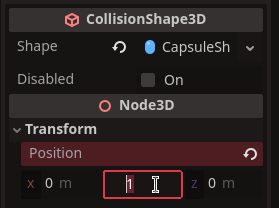
why?
If the CollisionShape3D's bottom is at the Player's origin, you can place the Player on the ground in your scenes. If the collision shape is centered, the Player will not detect the ground properly and fall through.
Now that we have provided a physical presence for our Player we can move on and add a visual resprentation.
Add a visual shape to the Player
Right click the Player and select the Add Child Node... option. 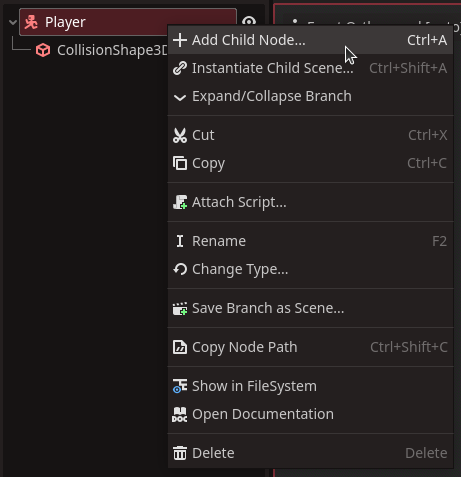
Search for Mesh and select the MeshInstance3D option. 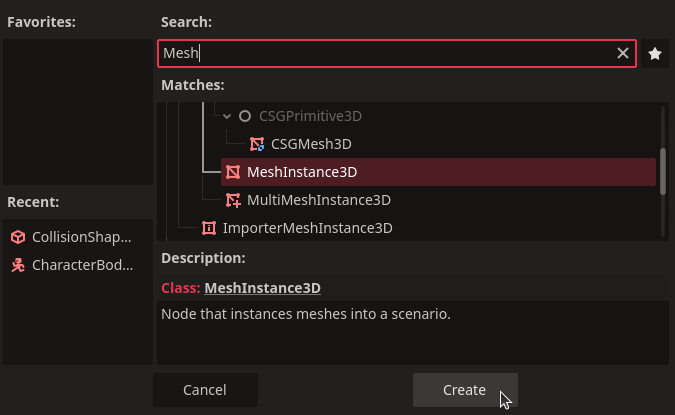
Over in the Inspector we add a New CapsuleMesh by clicking the Mesh property with <empty>, then selecting the New CapsuleMesh. 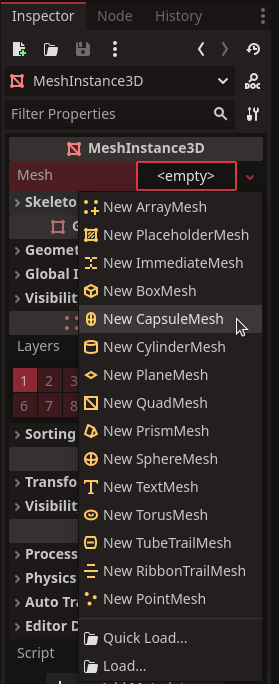
WARNING
The MeshInstance3D is unaligned with the Player's physical presence. 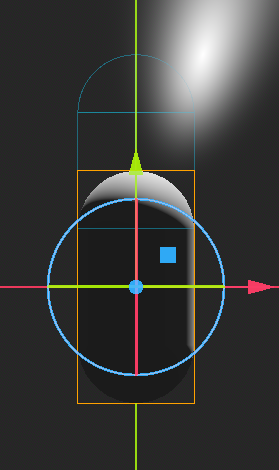
So let's align the MeshInstance3D with the CollisionShape3D by raising it by 1 unit on the Y axis. 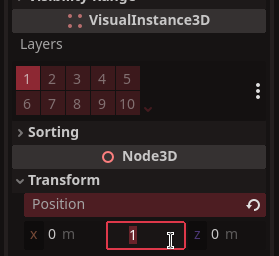
why?
We set the MeshInstance3D Y position to the same as the CollisionShape3D's Y position, so that the visual mesh representation of the player ligns up with it's physical presence.
If they are unaligned the Visual component of the Player may phase into other physical objects because it is offset from the CollisionShape3D. In this example, failing to raise the MeshInstance3D would make the Player look like it is half way in the ground.
Now that we have a visual representation of our Player we can add a camera to the our scene.
Add the Camera to the Player
Add another child node to our Player root node. Right click the Player node and select the Add Child Node option. 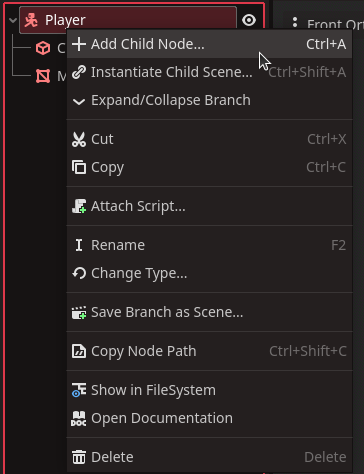
Search for Camera then select the Camera3D and click the Create button. 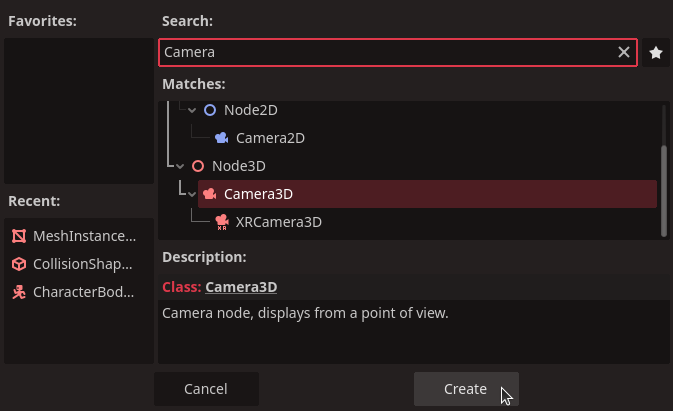
While having the Camera3D node selected, move over to the Inspector and set the Position component of Transform to 5.5 on the Y and 8 on the Z axis. 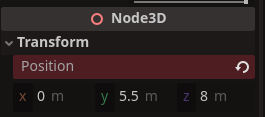
Rotate the camera down on the X axis. With the position we chose (5.5 on Y and 8 on Z) -30 degrees works quite well. 
Verify the Player scene
The Scene outline should look like this if you followed this tutorial. 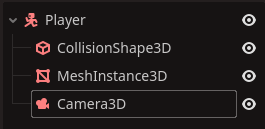
The 3D viewport should look something like this. 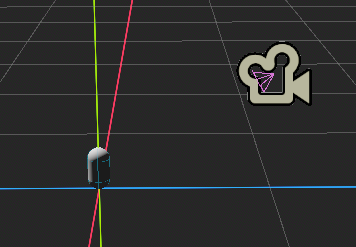
Adding logic to the Player
Attach a script to the Player root node. 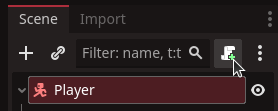
In our case we can leave everything as default here and click the Create button. This will result in a player.gd script containing a class extending CharacterBody3D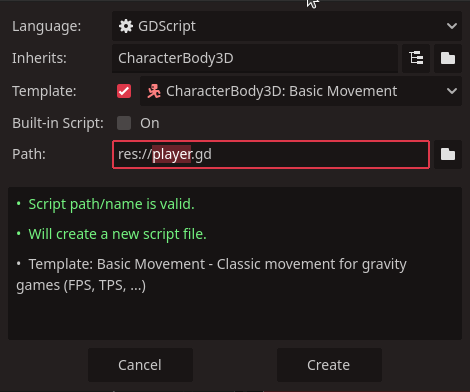
Now edit the script by clicking on the Player node's script icon. 
If you followed these steps you should now see a Script window in the middle with the contents of the player.gd script. The script should look like this:
extends CharacterBody3D


const SPEED = 5.0
const JUMP_VELOCITY = 4.5


func _physics_process(delta: float) -> void:
	# Add the gravity.
	if not is_on_floor():
		velocity += get_gravity() * delta

	# Handle jump.
	if Input.is_action_just_pressed("ui_accept") and is_on_floor():
		velocity.y = JUMP_VELOCITY

	# Get the input direction and handle the movement/deceleration.
	# As good practice, you should replace UI actions with custom gameplay actions.
	var input_dir := Input.get_vector("ui_left", "ui_right", "ui_up", "ui_down")
	var direction := (transform.basis * Vector3(input_dir.x, 0, input_dir.y)).normalized()
	if direction:
		velocity.x = direction.x * SPEED
		velocity.z = direction.z * SPEED
	else:
		velocity.x = move_toward(velocity.x, 0, SPEED)
		velocity.z = move_toward(velocity.z, 0, SPEED)

move_and_slide()using Godot;
using System;
public partial class Player : CharacterBody3D
{
public const float Speed = 5.0f;
public const float JumpVelocity = 4.5f;
public override void _PhysicsProcess(double delta)
{
Vector3 velocity = Velocity;
// Add the gravity.
if (!IsOnFloor())
{
velocity += GetGravity() * (float)delta;
}
// Handle Jump.
if (Input.IsActionJustPressed("ui_accept") && IsOnFloor())
{
velocity.Y = JumpVelocity;
}
// Get the input direction and handle the movement/deceleration.
// As good practice, you should replace UI actions with custom gameplay actions.
Vector2 inputDir = Input.GetVector("ui_left", "ui_right", "ui_up", "ui_down");
Vector3 direction = (Transform.Basis * new Vector3(inputDir.X, 0, inputDir.Y)).Normalized();
if (direction != Vector3.Zero)
{
velocity.X = direction.X * Speed;
velocity.Z = direction.Z * Speed;
}
else
{
velocity.X = Mathf.MoveToward(Velocity.X, 0, Speed);
velocity.Z = Mathf.MoveToward(Velocity.Z, 0, Speed);
}
Velocity = velocity;
MoveAndSlide();
}
}As you can see the class isn't very large and it only defines two constants and a method to be executed once on every physics frame. The important part for us here is the lines:
extends CharacterBody3D
const SPEED = 5.0
const JUMP_VELOCITY = 4.5
func _physics_process(delta: float) -> void:
# Add the gravity.
if not is_on_floor():
velocity += get_gravity() * delta
# Handle jump.
if Input.is_action_just_pressed("ui_accept") and is_on_floor():
velocity.y = JUMP_VELOCITY
# Get the input direction and handle the movement/deceleration.
# As good practice, you should replace UI actions with custom gameplay actions.
var input_dir := Input.get_vector("ui_left", "ui_right", "ui_up", "ui_down")
var direction := (transform.basis * Vector3(input_dir.x, 0, input_dir.y)).normalized()
if direction:
velocity.x = direction.x * SPEED
velocity.z = direction.z * SPEED
else:
velocity.x = move_toward(velocity.x, 0, SPEED)
velocity.z = move_toward(velocity.z, 0, SPEED)
using Godot;
using System;
public partial class Player : CharacterBody3D
{
public const float Speed = 5.0f;
public const float JumpVelocity = 4.5f;
public override void _PhysicsProcess(double delta)
{
Vector3 velocity = Velocity;
// Add the gravity.
if (!IsOnFloor())
{
velocity += GetGravity() * (float)delta;
}
// Handle Jump.
if (Input.IsActionJustPressed("ui_accept") && IsOnFloor())
{
velocity.Y = JumpVelocity;
}
// Get the input direction and handle the movement/deceleration.
// As good practice, you should replace UI actions with custom gameplay actions.
Vector2 inputDir = Input.GetVector("ui_left", "ui_right", "ui_up", "ui_down");
Vector3 direction = (Transform.Basis * new Vector3(inputDir.X, 0, inputDir.Y)).Normalized();
if (direction != Vector3.Zero)
{
velocity.X = direction.X * Speed;
velocity.Z = direction.Z * Speed;
}
else
{
velocity.X = Mathf.MoveToward(Velocity.X, 0, Speed);
velocity.Z = Mathf.MoveToward(Velocity.Z, 0, Speed);
}
That is the code that will handle the user input and move the character accordingly. First there is a snippet of code that make the Player fall if Player isn't on the ground.
Then we handle input of ui_accept to see if we should apply an upward velocity for an instant, making the Player jump.
Lastly we get the direction the user is attempting to move the Player and reading it out as a Vector that we normalize to prevent the Player from moving faster in a diagonal direction.
And finally we call move_and_slide() to apply the velocity to the Player's transform, resulting in the Player moving on the screen.
INFO
You need to use the arrow keys and space or enter to see the Player move.
You can bind the WASD or other keys in your project settings and use the new binds to find the direction the Player should move in. Look at Assigning Keybinds or Customizing Player Controls to find out how.
The Player need to be part of a scene that has a floor with a StaticBody3D for the Player to "walk" on.